
The intention of this serie is not to rewrite the Roguelike tutorial, but to offer an alternative implementation using C# in Unity. I discovered pretty soon that the tutorial above will only help me to scope each week’s work, but the implementation will be very different between Python and C# . This week our main objective is to draw the “@” symbol that represents the player, as well as being able to move it around.
Main Resources:
- The original tutorial for Python can be found here
- Roguelikedev 2019 main thread here
- Discord: https://discord.gg/9pmFGKx #roguelikedev-help channel is a great place to hangout and get help in a more interactive setting. Feel free to ping me there for any question.
Engine.cs and drawing the player:
We’ll start by creating an empty game object called “Engine” as well as a new script attached to this object titled “Engine.cs”, which will act as our general game manager.
Its main class will inherit from Monobehaviour, and its Start() method will instantiate our Player:
using System.Collections;
using System.Collections.Generic;
using UnityEngine;
public class Engine : MonoBehaviour
{
public static GameObject __player;
public void Start()
{
GameObject playerObject = Resources.Load<GameObject>("Prefabs/Player");
__player = Instantiate(playerObject, new Vector3(0, 0, 0), Quaternion.identity);
}
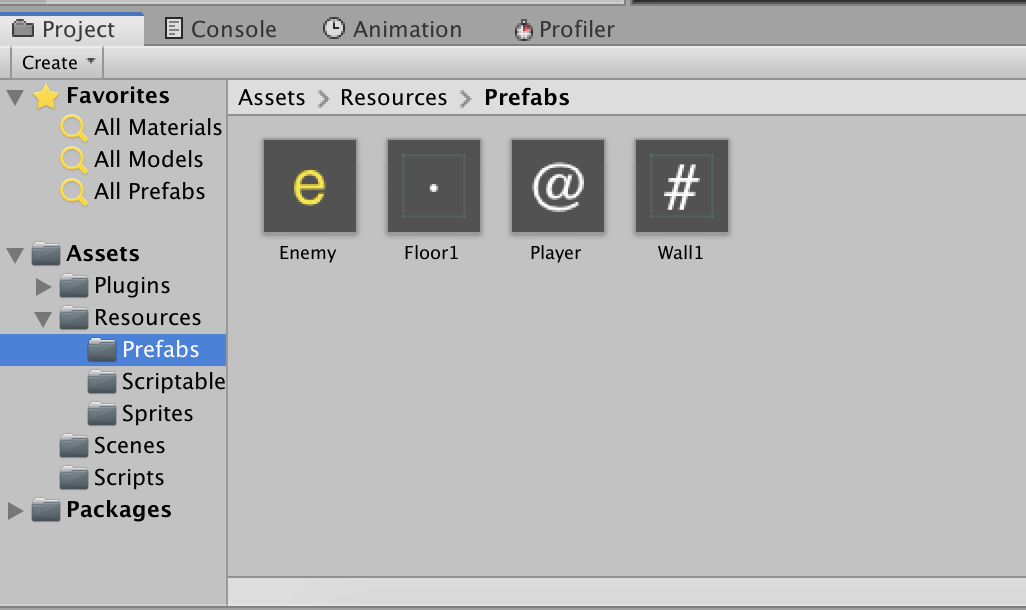
}What we’re doing at GameObject playerObject = Resources.Load<GameObject>("Prefabs/Player"); is to assign a Prefab called Player to the playerObject GameObject, this will load from our Resources folder in the Unity folder structure:

We create a new GameObject named Player, add a SpriteRenderer component, set its Sprite to the sprite we want to use (in this case I used a 32x32px png that can be downloaded here (white version) and here (black version), and move the GameObject inside our Prefabs folder in order to create a Prefab. Once this is done it can be deleted from the hierarchy.
On __player = Instantiate(playerObject, new Vector3(0, 0, 0), Quaternion.identity); we’re instantiating this playerObject at vector 0, 0, 0, which will be our starting position, and assigning it to our __player static GameObject

As a little detail, we can also change the Unity background from the default blue color to be black. In reality this is not Unity’s background color but the default colour our main camera see when no objects are being rendered, so we’ll change this from our main camera:

InputHandler.cs : Moving the player
We’ll create a new script called InputHandler.cs and attach this as a component of our player prefab. We’ll also declare and assign a variable to our player, which as is a static GameObject created on Engine.cs, will be easily accessible:
 public class InputHandler : MonoBehaviour
{
    GameObject player;

     private void Start()
    {
        player = Engine.__player;
    }
}
We create an Update() method and add Input.GetKeyDown() checks to record specific keys that are pressed in our keyboard:
     private void Update()
    {
        if (Input.GetKeyDown(KeyCode.W))
        {
            MovePlayer("up");
        }
        else if (Input.GetKeyDown(KeyCode.S))
        {
            MovePlayer("down");
        }
        else if (Input.GetKeyDown(KeyCode.D))
        {
            MovePlayer("right");
        }
        else if (Input.GetKeyDown(KeyCode.A))
        {
            MovePlayer("left");
        }
}
This will record when W,S,A,D are pressed and call the method MovePlayer(), passing a string as a parameter. We then create such method:
     public void MovePlayer(string direction)
    {
        switch (direction)
        {
            case "up":
                float yPositive = player.transform.localPosition.y + 1.0f;
                player.transform.localPosition = new Vector3(player.transform.localPosition.x, yPositive, 0);
                break;
            case "down":
                float yNegative = player.transform.localPosition.y - 1.0f;
                player.transform.localPosition = new Vector3(player.transform.localPosition.x, yNegative, 0);
                break;
            case "right":
                float xPositive = player.transform.localPosition.x + 1.0f;
                player.transform.localPosition = new Vector3(xPositive, player.transform.localPosition.y, 0);
                break;
            case "left":
                float xNegative = player.transform.localPosition.x - 1.0f;
                player.transform.localPosition = new Vector3(xNegative, player.transform.localPosition.y, 0);
                break;

         }
    }
What we’re doing here is just a switch check, and based on the case, modify X or Y player position and add +1, that way moves in the correct direction.
The movement problem
This comes with a problem: If the player decides to press more than once per second, these methods will be called multiple times and we’ll be moving the player before its previous movement finishes, breaking the whole functionality:

To solve this we add a private bool isPlayerMoving check , which will block any movement if the previous movement has not finished:
     private void Update()
    {
        if (Input.GetKeyDown(KeyCode.W) && isPlayerMoving == false)
        {
            isPlayerMoving = true;
            MovePlayer("up");
        }
        else if (Input.GetKeyDown(KeyCode.S) && isPlayerMoving == false)
        {
            isPlayerMoving = true;
            MovePlayer("down");
        }
        else if (Input.GetKeyDown(KeyCode.D) && isPlayerMoving == false)
        {
            isPlayerMoving = true;
            MovePlayer("right");
        }
        else if (Input.GetKeyDown(KeyCode.A) && isPlayerMoving == false)
        {
            isPlayerMoving = true;
            MovePlayer("left");
        }

         if (Input.GetKeyDown(KeyCode.Escape))
        {
            // TODO: Will implement game menu screen here in the future.
        }

     }

     public void MovePlayer(string direction)
    {
        switch (direction)
        {

/* All previous cases go here. No need to modify these in any way */
         }
        isPlayerMoving = false;
    }
We set isPlayerMoving = false when MovePlayer() finishes, this enables that a pressed key can call the method again for a new direction:
And that’s all for this chapter! Now is time to commit && push the changes.
The code for this part alone can be found in this commit: https://github.com/iamgabrielma/roguelikedev2019/commit/40361a1387a489f8444d5eaa1f992864515c8742
The full code (so far) can be found in this repository: https://github.com/iamgabrielma/roguelikedev2019
Feel free to comment below, or ping me in the #roguelikedev-help discord channel for any question, suggestion, or criticism.
Leave a Reply